📖 Read more: 5G & Drones: Flights Beyond Visual Line of Sight (BVLOS)
Why Build Your Own FPV Drone?
The question many beginners ask is: “Why spend hours building when I can just buy a ready-to-fly BNF drone?” The answer is multifaceted. According to Oscar Liang — one of the most recognized experts in the FPV community — building teaches you the anatomy of every component, enables you to diagnose problems, repair crashes in the field, and upgrade whatever you want in the future.
DIY Advantages
- Complete understanding of every part
- Ability to repair without help
- Full customization to your needs
- Can be cheaper overall
- Valuable soldering skills
BNF/RTF Advantages
- Fly immediately — zero build time
- Factory quality control
- Manufacturer warranty
- Ideal if you lack tools
- Minimal technical knowledge needed
The Parts You Need
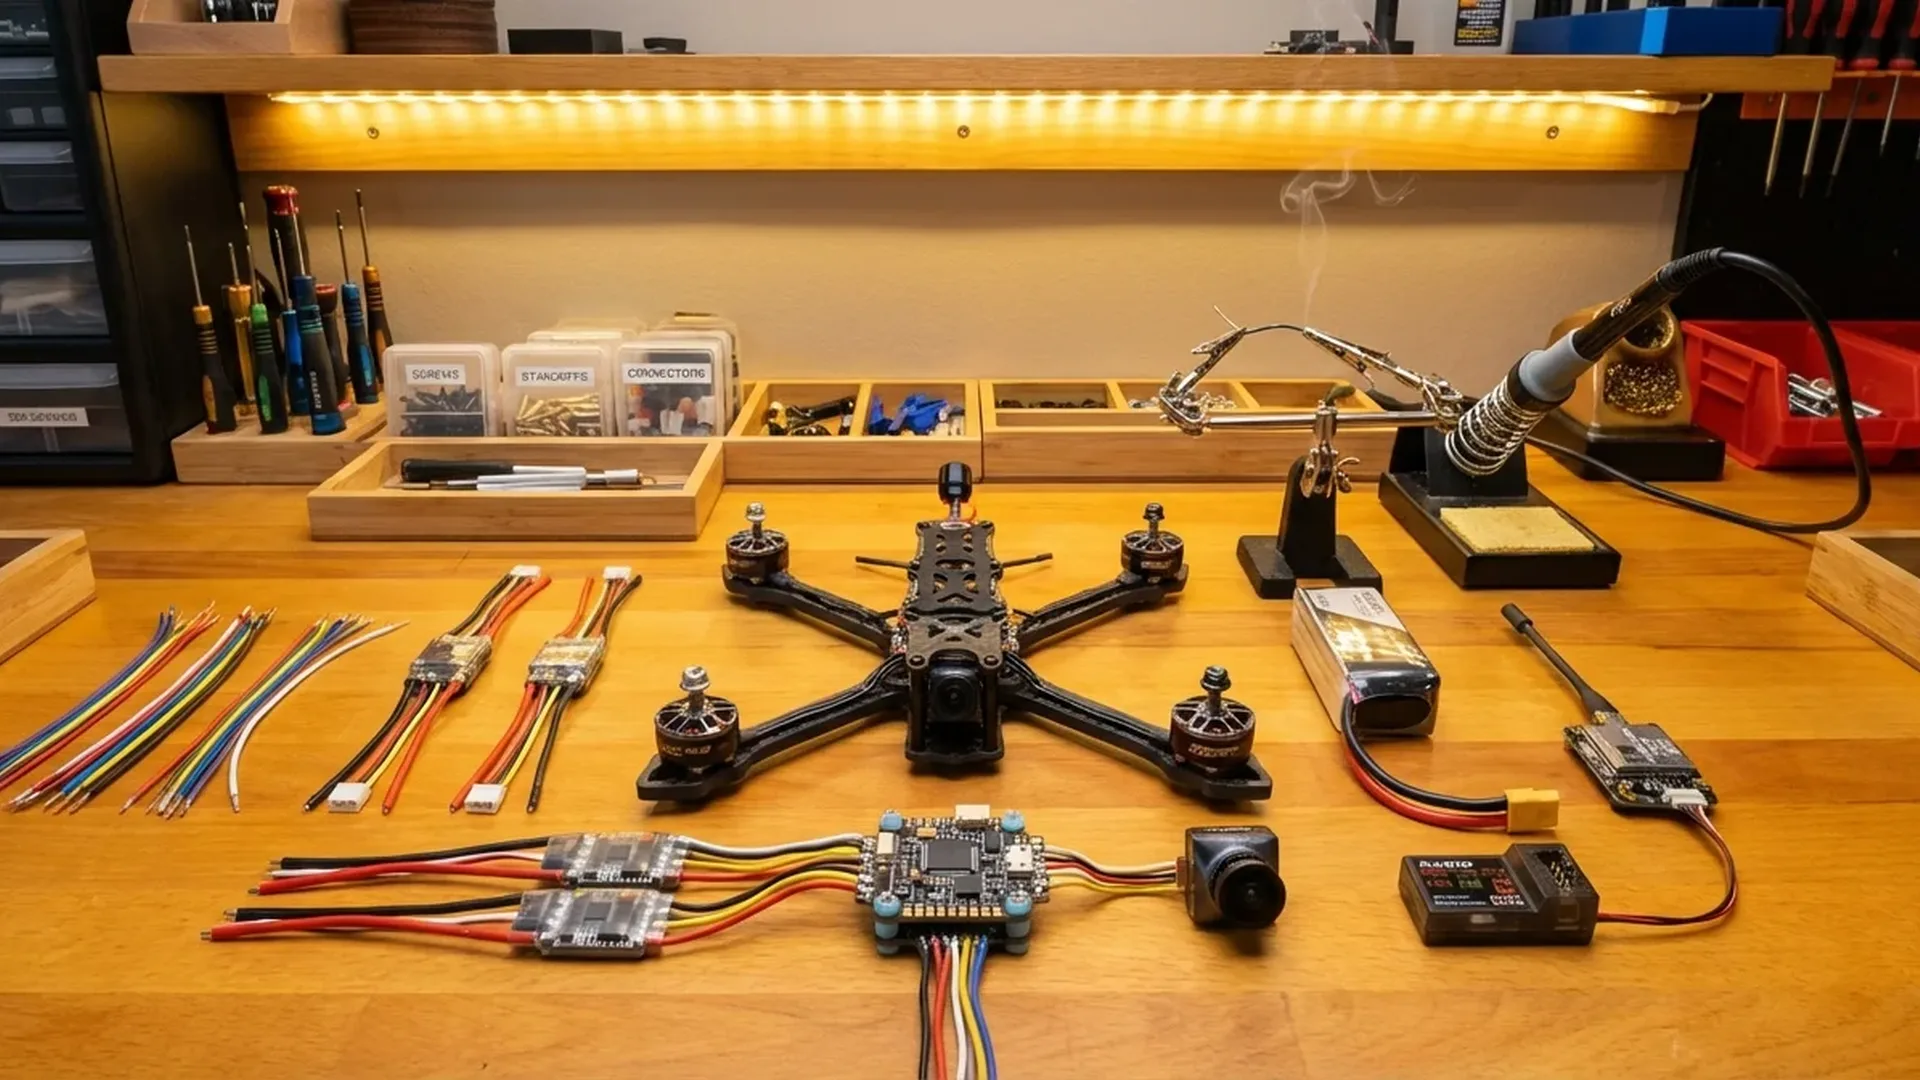
A typical 5-inch FPV drone consists of 7 essential components. Each plays a critical role in performance and reliability. Below is the full parts list with prices confirmed through Oscar Liang (April 2025, converted to EUR).
🛠️ Anatomy of an FPV Drone
Frame
The foundation that holds everything together. Carbon fiber for durability. Popular 5″ frames: GEPRC Vapor, TBS Source One V5, AxisFlying Manta 5 SE.
FC (Flight Controller)
The “brain” of the drone. Contains gyro sensor and processor. Runs Betaflight firmware. Popular choice: SpeedyBee F405 V4.
ESC (Speed Controller)
Controls each motor's speed. Modern ESCs come as 4-in-1 boards stacked with the FC. Protocol: DShot300/600.
Motors (4×)
Four motors, typically 2207 or 2306 for 5″. For 6S builds: 1700-1900KV. Budget: EMAX ECO II ~€15 (~$16) each, T-Motor Velox ~€14 (~$15) each.
Propellers (4×)
2 CW + 2 CCW. Best all-rounder: HQ 5×4.3×3 V2S. Price: ~€3-4 (~$3-4) per set of 4. Buy extras — they break easily!
FPV System (VTX + Camera)
Transmits live video to your goggles. Analog (budget): TX805 ~€12 (~$13) + Foxeer Razer ~€17 (~$18). Digital: DJI O4 Pro ~€200 (~$215). Walksnail as mid-range option.
Receiver (RX)
Receives signal from your radio controller. ExpressLRS (ELRS) 2.4GHz is the current standard — fast, affordable, reliable. From ~€3-10 (~$3-11).
LiPo Battery
6S 1100-1300mAh for 5-7 minutes of flight. GNB, CNHL, Tattu R-Line. Price: ~€20-30 (~$22-32) per battery. Always charge safely!
Parts List: Budget vs Premium Build
Here are two builds based on real parts lists from Oscar Liang (November 2024 & April 2025 updates). EUR prices are converted from USD (~×0.93).
💰 Budget Build (~€210 / ~$230 drone only)
| Part | Model | Price (EUR) |
|---|---|---|
| Frame | TBS Source One V5 | ~€28 (~$30) |
| FC + ESC Stack | SpeedyBee F405 V4 + 55A | ~€65 (~$70) |
| Motors (4×) | T-Motor Velox 2207 1950KV | ~€56 (~$60) |
| VTX | Eachine TX805 (800mW) | ~€12 (~$13) |
| FPV Camera | Foxeer Razer Micro | ~€17 (~$18) |
| Receiver | BAYCK ELRS 2.4GHz Nano | ~€9 (~$10) |
| Battery | 6S 1100mAh LiPo | ~€24 (~$26) |
| Propellers | HQ 5×4.3×3 V2S (1 set) | ~€3 (~$3) |
| Total Drone Cost | ~€214 (~$230) | |
⚡ Premium Build — DJI O4 Pro (~€410 / ~$440 drone only)
| Part | Model | Price (EUR) |
|---|---|---|
| Frame | GEPRC Vapor X5/D5 | ~€45 (~$48) |
| FC + ESC Stack | SpeedyBee F405 V4 + 60A | ~€65 (~$70) |
| Motors (4×) | EMAX ECO II 2207 1900KV | ~€60 (~$64) |
| FPV System | DJI O4 Pro Air Unit | ~€200 (~$215) |
| Receiver | BetaFPV ELRS 2.4GHz Nano | ~€9 (~$10) |
| Battery | 6S 1300mAh LiPo | ~€28 (~$30) |
| Propellers | HQ 5×4.3×3 V2S (1 set) | ~€3 (~$3) |
| Total Drone Cost | ~€410 (~$440) | |
Note: These prices cover only the drone itself. You'll also need a radio controller (Radiomaster Pocket ~€60 / ~$65, Boxer ~€110 / ~$120), FPV goggles (EV800D ~€63 / ~$68 analog, DJI Goggles N3 €351 / ~$379, DJI Goggles Integra €482 / ~$519), a LiPo charger (SkyRC B6Neo ~€23 / ~$25), and tools. A full analog setup costs around €360 (~$390), while a DJI digital setup exceeds €900 (~$970).
Tools & Supplies
Before starting your build, make sure you have the right tools. Most are easily available at local hardware stores or through online retailers.
✅ Essential
⭐ Optional (Recommended)
The 11 Build Steps
The following sequence is based on Oscar Liang's detailed build tutorial for a DJI O4 Pro build (April 2025). The same logic applies to analog builds — only the FPV system changes.
Frame Assembly
Bolt together the carbon fiber parts following the manual. Connect arms, bottom plate, and top plate. Make sure everything is tight but not overtightened.
Motor Installation
Mount all 4 motors to the arms using 4 screws per motor. Apply threadlocker. Be careful with screw length — too long and they'll puncture the windings.
Wiring Diagram
Before soldering anything, do a dry fit. Place all components on the frame and measure wire lengths. Plan where everything will go.
ESC Installation
Place the 4-in-1 ESC board onto the stack bolts. Solder motor wires to motor pads. Solder the capacitor and XT60 power lead.
Test ESC & Motors
Before continuing, check for shorts with a multimeter. Connect battery (without propellers!) through a smoke stopper. Spin test each motor in Betaflight.
Radio Receiver Setup
Solder the ELRS receiver: 5V, GND, TX, RX to the corresponding FC pads. Bind with your radio. Verify in Betaflight's Receiver tab.
FPV System Installation
For DJI O4 Pro: plug-and-play cable to FC. For analog: solder VTX (2S-6S, GND, RX, Video) and camera. Mount antenna properly.
Camera Mount
Mount the FPV camera in the camera mount or between silicone dampers. Camera tilt: 10-15° for beginners, 20-30° for faster flying.
Finishing & Top Plate
Tighten FC with nylon nuts (hand-tight only — don't compress the silicone grommets). Attach top plate. Weight: ~453g without battery, ~645g with 6S 1100mAh.
Betaflight Setup
Configure firmware, ports, receiver protocol (CRSF), OSD elements, modes (Arm, Angle, Beeper, Flip Over After Crash). Follow the Betaflight setup wizard.
PID Tuning & First Flight
Stock Betaflight PIDs are good enough to start. Flash Bluejay ESC firmware, enable RPM filter. First flight in an open area!
Soldering Guide for Beginners
Soldering is the most critical skill in DIY FPV. Bad solder joints mean bad connections, which means lost drones. Follow these essential rules:
- Temperature: 380°C for thin signal wires, 450°C for thick power pads (XT60, motor wires)
- Tin the pads first: Apply a small amount of solder to the pad before attaching the wire — this creates proper thermal contact
- Flux: Use flux paste generously — it makes the job 10× easier
- Shiny joints: A proper solder joint should be shiny. If it's dull or you can see wire strands poking through, there isn't enough solder
- Don't overheat: Maximum time on each pad: 3-5 seconds. If it doesn't take, let it cool down and try again
- Twist the wires: Reduces EMI noise and gives a clean look
Pro Tip: Before soldering on the drone itself, practice on an old PCB or practice boards. 10 minutes of practice can save you hours of troubleshooting.
Software Setup: Betaflight
Betaflight is the most popular open-source firmware for FPV drones — used by the vast majority of pilots worldwide. Configuration is done through Betaflight Configurator (Chrome extension or standalone app).
📋 Essential Settings
Ports Tab
Enable Serial RX on the UART connected to your receiver. Enable VTX (MSP + Displayport) on the UART connected to your FPV system.
Receiver Tab
Receiver Mode: Serial (via UART). Provider: CRSF (for ELRS). Enable Telemetry. Move the sticks — the bars should respond.
Modes Tab
Arm: Primary switch to enable motors. Angle Mode: Self-level for beginners. Beeper: Locating the drone. Flip Over After Crash (Turtle Mode).
OSD Tab
On-Screen Display: view battery voltage, flight time, RSSI, GPS (if equipped). Select HD Video Format if using DJI/Walksnail.
🎛️ ESC Firmware
Most ESCs run BLHeli_S or BLHeli_32. According to Oscar Liang, it's worth flashing Bluejay firmware on BLHeli_S ESCs — it provides better responsiveness. You can choose 24kHz (better torque) or 48kHz (smoother flight). Then enable bi-directional DShot and RPM filter — one of the best filtering options in Betaflight.
First Flight: The Basics
Before flying, spend at least 10 hours in a simulator. The most popular options: Velocidrone (~€18 / ~$20), Liftoff, Tryp FPV. Use the same radio you'll fly with — the muscle memory transfers directly.
IMPORTANT: Learn in Acro Mode (manual) from the start! Self-level modes (Angle, Horizon) may seem easier but create bad habits that are hard to unlearn. Betaflight's Acro Trainer mode helps with the transition.
🛡️ First Flight Checklist
- Propellers on correct motors (2 CW + 2 CCW) — verify direction!
- M5 lock nuts tight (but not overtightened — it'll crack the prop hub)
- Battery centered on the drone — center of gravity above motor center
- Failsafe test: power off the radio — motors should stop immediately
- GPS Rescue enabled (if you have a GPS module)
- Beeper test — you'll need it after a crash!
- Fly in open space, away from people, over soft ground
Total Equipment Cost
Let's break down the full cost — drone + controller + goggles + charger — in two scenarios.
📊 Budget Setup (Analog)
| Category | Model | Price |
|---|---|---|
| 5″ Drone (analog build) | Source One V5 + SpeedyBee F405 V4 + Velox Motors + TX805 | ~€214 (~$230) |
| Radio Controller | Radiomaster Pocket (ELRS) | ~€60 (~$65) |
| FPV Goggles | Eachine EV800D | ~€63 (~$68) |
| Charger | SkyRC B6Neo | ~€23 (~$25) |
| Total Budget Setup | ~€360 (~$390) | |
📊 Premium Setup (DJI Digital)
| Category | Model | Price |
|---|---|---|
| 5″ Drone (DJI O4 Pro build) | GEPRC Vapor + SpeedyBee F405 V4 + ECO II Motors + O4 Pro | ~€410 (~$440) |
| Radio Controller | Radiomaster Boxer (ELRS) | ~€110 (~$120) |
| FPV Goggles | DJI Goggles Integra | €482 (~$519) |
| Charger | SkyRC B6Neo | ~€23 (~$25) |
| Total Premium Setup | ~€1,025 (~$1,104) | |
Common Beginner Mistakes
❌ Wrong Motor Screw Length
If the screw hits the windings, you'll destroy the motor. Always measure or use the screws provided by the manufacturer.
❌ Plugging Battery Without Smoke Stopper
First power-up without a smoke stopper risks frying your electronics. A SmokeStopper costs ~€15 (~$16) — it's well worth it.
❌ Propellers on Wrong Motors
CW on a CCW motor = instant flip on takeoff. Always verify motor direction in Betaflight BEFORE attaching props.
❌ VTX Antenna Disconnected
Powering on the drone without an antenna on the VTX can burn it out. Always make sure the antenna is properly connected.
❌ Over-tightening Nylon Nuts
FC silicone grommets need clearance to absorb vibrations. Tighten by hand only.
❌ Skipping Simulator Practice
100+ crashes in the simulator saves hundreds of euros in spare parts. Don't skip this step.
Frequently Asked Questions (FAQ)
How long does the build take?
For your first build, expect 4-8 hours. With experience, 1-2 hours. Build time depends mostly on your soldering skills.
Can I use a 4S battery instead of 6S?
Yes, but you'll need higher KV motors (2400-2700KV for 4S vs. 1700-1900KV for 6S). 6S builds provide better throttle response and have become the standard in the hobby.
Do I need a GPS module?
Not mandatory, but highly recommended. A GPS module (e.g., HGLRC M100 Mini, ~€15-20 / ~$16-22) enables GPS Rescue (return to home on signal loss). Very useful for freestyle and long-range flights.
DJI O4 Pro or analog for a beginner?
If your budget is limited, start with analog. The image quality isn't as good, but it costs a fraction. If you can invest more, DJI O4 Pro delivers unmatched video quality and signal reliability.
What if a motor doesn't spin?
First check that the battery is connected and the smoke stopper is active. Then re-check the solder joints on the ESC. If the other motors work, swap a working motor into that position to determine if the issue is the motor or the ESC pad.