📖 Read more: Drone Photography: 15 Tips for Stunning Aerial Shots
What Exactly Is FPV Freestyle
In FPV freestyle, the pilot flies a drone in full manual mode (acro mode) — no auto-level, no GPS stabilization. Every movement depends entirely on your hands. Unlike drone racing (where the goal is speed), freestyle is about creativity: you fly acrobatics, thread through gaps, perform tricks around buildings or trees, and create stunning video.
5-inch quads are the most popular size for freestyle. They weigh 600-800g with a battery, reach speeds over 180 km/h, and can carry an action camera (GoPro/Insta360) for cinematic footage. A complete freestyle setup (drone + goggles + transmitter + action camera) costs roughly €600-1,200 (~$587-1,174) depending on your choices.
Essential Freestyle Tricks
Every freestyle pilot starts with the fundamentals. Here are the tricks you need to learn, organized by difficulty level:
Power Loop
Fly forward, pull back on pitch while maintaining 70-80% throttle. The drone performs a vertical loop. This is THE first trick every pilot learns — and one of the most spectacular on camera. Start at altitude and gradually lower it.
Split-S
Roll 180° (go inverted), then pull back on pitch. You immediately descend while reversing direction. Essential for quick direction changes and incredibly effective in proximity passes near buildings.
Orbiting
Circle around an object (building, tree, tower) while keeping the camera locked on it. Requires simultaneous yaw + roll + throttle. Fundamental in every cinematic video.
Matty Flip
Essentially a “reverse power loop.” Fly forward, pitch forward (not back), flip inverted while moving. Looks incredible on camera because the view shifts to the sky mid-maneuver.
Juicy Flick
A quick snap roll combined with yaw. Creates a dramatic whip effect on video. The movement happens almost instantaneously — requires precise stick inputs and properly tuned rates.
Rubik's Cube
Simultaneous roll + pitch + yaw in continuous multi-axis rotation. Like “scrambling” the drone mid-air. One of the most visually stunning tricks — but demands exceptional control.
Inverted Yaw Spin
Go inverted (roll 180°), then yaw spin like a helicopter upside down. Combines beautifully with dives or gap passes. Requires steady throttle management while inverted — otherwise you lose altitude fast.
Dive & Gap
Vertical dive at high speed, pull up right before the ground, or thread through a tight gap at speed. Pure adrenaline — the core reason people fall in love with FPV.
Tip: BEFORE attempting any trick on a real drone, practice it in a simulator. Velocidrone (~€18 / ~$18), TRYP FPV, and Liftoff are excellent FPV sims. You'll crash 100 virtual drones before crashing a real one — and save a fortune in the process.
Drone Settings for Freestyle
Camera Tilt Angle
The FPV camera angle determines how you fly. For freestyle, the sweet spot is 25-35 degrees. Lower angles (15-20°) produce slower, more cinematic flight. Higher angles (35-45°) mean faster forward movement — great for racing but harder to maintain precision during tricks. Start at 25° and increase gradually as you improve.
Rates (Rotation Speeds)
Betaflight rates control how fast the drone rotates around each axis. A solid starting point for freestyle:
- Roll/Pitch Max Rate: 700-850°/sec — fast enough for snappy tricks without losing control
- Yaw Max Rate: 600-700°/sec — slightly slower for more controlled yaw spins
- Center Sensitivity (RC Rate): Low → more precise control near the center, smoother movements
- Expo: 0.2-0.4 — reduces over-sensitivity near center, gives a “soft” response near the middle and explosive response at the extremes
PID Tuning
PIDs (Proportional, Integral, Derivative) control how the drone responds to your inputs. For freestyle, the default PIDs in Betaflight 4.5+ are solid out of the box. If you notice oscillations (wobbles) in hover, reduce the P gains. If the drone feels “sluggish,” increase D gains slightly. Don't touch PIDs until you're confident you know what you're doing — the defaults work well.
Gear for Stunning Video
The Drone
For freestyle video, you need a 5-inch FPV quad. The two most popular prebuilt (BNF) freestyle drones as of February 2026:
- AxisFlying Manta 5 SE: Outstanding value for money, available in analog and DJI O3 versions. The analog version starts at ~€180-200 (~$176-196) for the frame alone, or ~€350-450 (~$342-440) as BNF. Ideal for budget builds.
- GEPRC Vapor D5: Premium build with DJI O4 Pro support. Robust construction, innovative design, superb flight performance. The X5 version (True X pattern) is preferred for freestyle, the D5 (Wide X) for cinematic. BNF price: ~€400-550 (~$391-538) depending on VTX.
For custom builds, recommended parts per Oscar Liang (February 2026): TBS Source One V5 or GEPRC Vapor X5 frame, iFlight Xing2 2207 motors (~€20 / ~$20 each, excellent performance), SpeedyBee F405 Mini FC+ESC stack (~€55 / ~$54), HQ 5×4.3×3 V2S props (best all-rounder), GNB 6S 1300mAh LiHV batteries.
Action Camera
The FPV camera on the drone feeds your goggles but the quality is low. For impressive video, you need a separate action camera mounted on the drone:
- GoPro Hero 13 Black: The classic choice. 5.3K/30fps or 4K/120fps, excellent stabilization (HyperSmooth), ReelSteady support. Weight: ~154g. Price: ~€370-400 (~$362-391).
- Insta360 Ace Pro 2: 8K/30fps or 4K/120fps, 1/1.3″ sensor, excellent in low light. Price: ~€350-380 (~$342-372).
- GoPro “Bones” (naked GoPro): Strip the housing and the GoPro drops to ~40g — massive weight savings. GoPro now sells an official “Bones” version. Perfect for freestyle quads.
- DJI O4 Pro Camera: The built-in camera on the DJI O4 Pro Air Unit records in 4K/60fps — if you fly DJI, you may not need a separate action camera at all.
Camera Settings for Freestyle
Settings depend on whether you want a cinematic (smooth) or snappy (fast-paced) look:
📖 Read more: DJI Mini 5 Pro: Full Review 2026
- Resolution: 2.7K/60fps or 4K/30fps — enough resolution for YouTube 4K while retaining slow motion capability (2.7K/60 → 24fps slow mo)
- FOV: Wide or SuperView/MaxLens — wide field of view enhances the sensation of speed
- Stabilization: OFF during recording — stabilization is applied in post with ReelSteady (GoPro) or Gyroflow (free, open-source)
- ND Filters: Use ND filters (ND8-ND32) to keep shutter speed low (1/100-1/120) — creates natural motion blur for a cinematic feel
- Color Profile: Flat/ProTune — provides more dynamic range for color grading in post
"A 3-minute freestyle edit requires 10-15 battery packs worth of footage. Fly a lot, keep very little. The selection process (editing) makes the difference — not the quantity."
10 Tips for Better Freestyle Videos
- Fly close to objects: Proximity creates the sensation of speed. A 2m pass next to a wall looks 10x more impressive than a 20m one.
- Maintain flow: Don't pause between tricks. The best videos have continuous flow — one trick leads directly into the next without stopping.
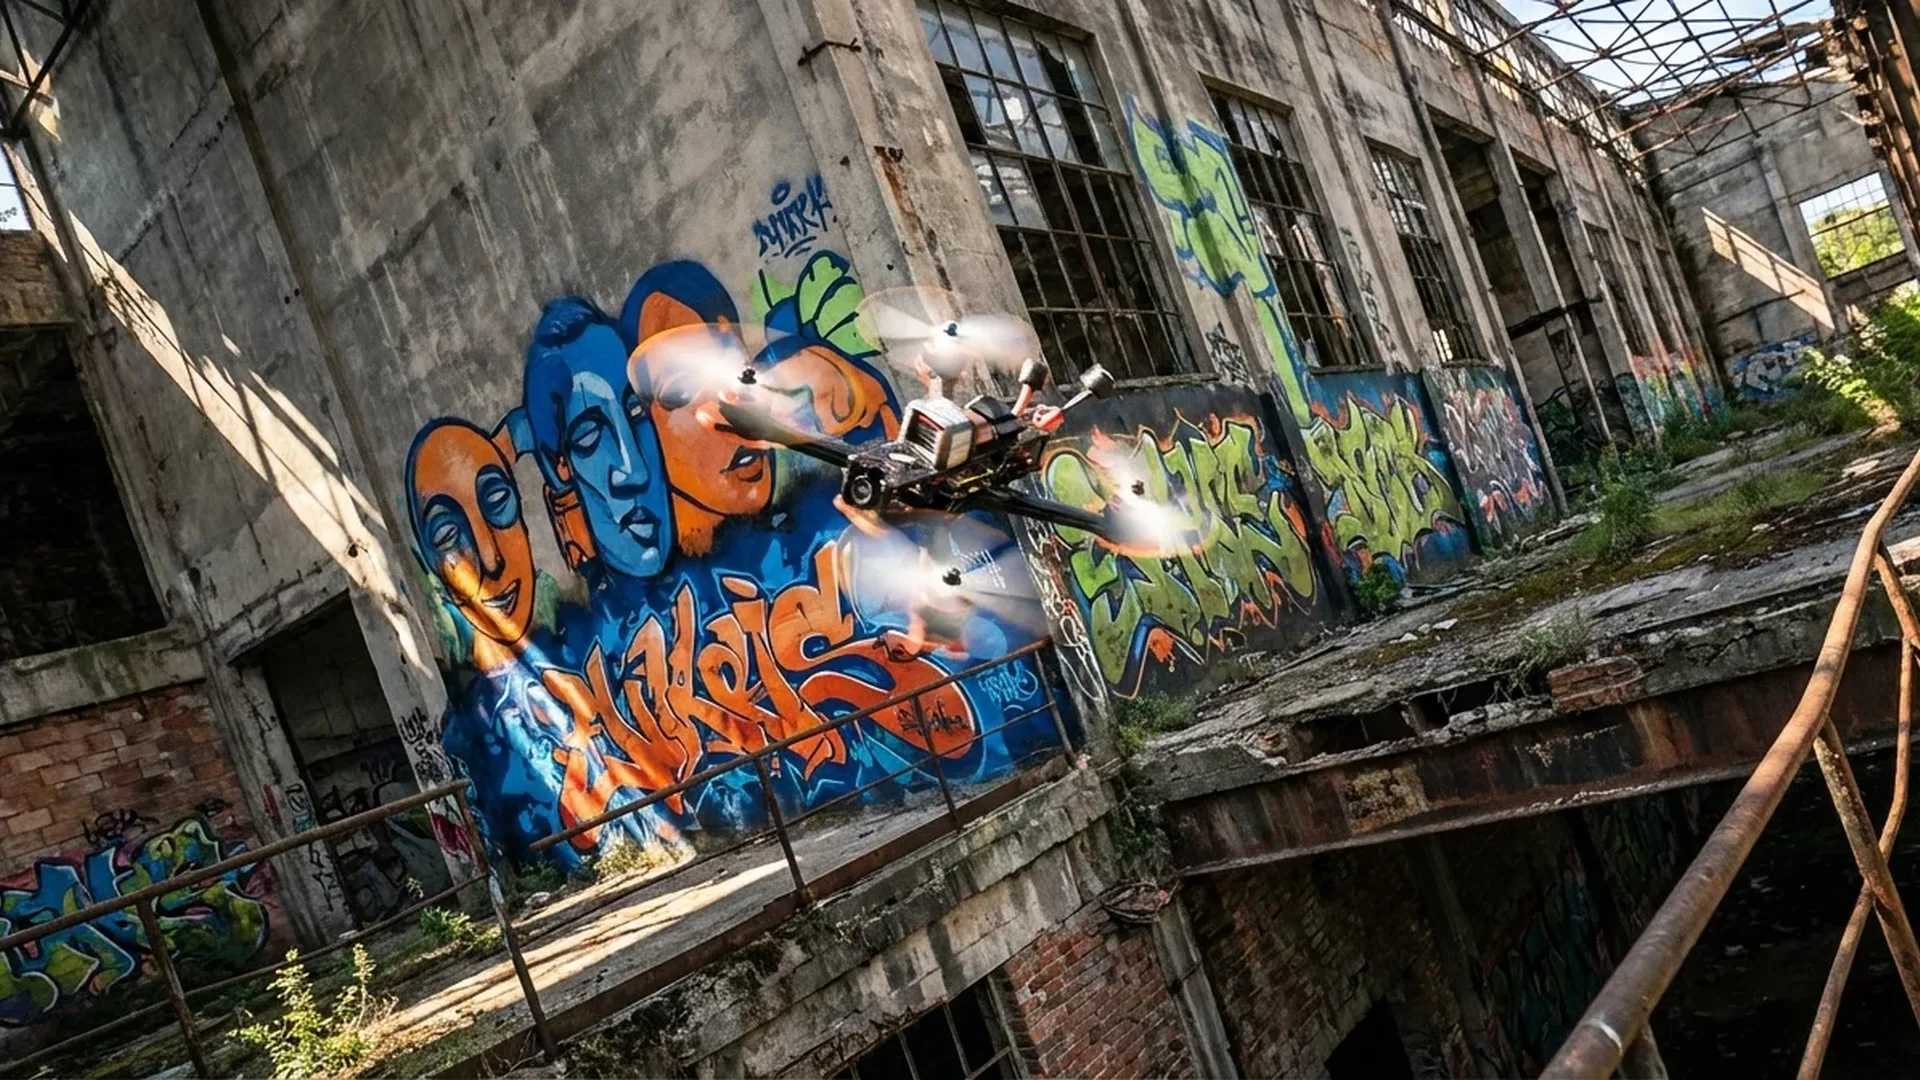
- Find interesting spots: Abandoned buildings, bridges, graffiti walls, industrial areas — the location matters as much as the tricks.
- Fly during golden hour: 30-60 minutes before sunset. The lighting becomes magical — warm colors, soft shadows, dramatic skies.
- Cut ruthlessly: In editing, keep only the best 10-20 seconds from each battery. Better to have 90 seconds of phenomenal footage than 5 minutes of mediocre material.
- Music first: Choose the music BEFORE you edit. Cut clips to the beat. Music dictates the rhythm of the entire video.
- Use Gyroflow/ReelSteady: Post-stabilization transforms shaky footage into butter-smooth video. Gyroflow is free and open-source.
- Practice in a simulator: 15-30 minutes of sim daily dramatically improves muscle memory. Velocidrone (~€18 / ~$18) is the most realistic.
- Don't fear crashes: Every pilot breaks props, arms, and cameras. Keep spares in your bag — 5-6 prop sets, spare arms, zip ties.
- Upload regularly: Post on YouTube, Instagram Reels, TikTok. The FPV community is welcoming — feedback will help you improve fast.
Top Freestyle Pilots (Inspiration)
Watch the best to get ideas for style and technique:
- Mr Steele: The “godfather” of FPV freestyle. His style (smooth, flowing lines) defines the entire genre. Started on analog and remains the benchmark for every new pilot.
- Le Drib (Drew Camden): The pilot who made the “juicy flick” mainstream. Incredible at urban exploration spots, outstanding editing on every video.
- Skitzo (Tommy Tibajia): Literally invented some of the most complex tricks in FPV. The most technical pilot in the world.
- BotGrinder: Urban freestyle in abandoned buildings. Raw, aggressive style, unique scene composition.
- Johnny FPV: The most cinematic freestyle pilot. Works on Hollywood productions, Red Bull events, and major brand campaigns. The reason many people discovered FPV.
Editing: How to Build the Final Video
Editing accounts for at least 50% of a freestyle video. Flying quality matters, but presentation wins viewers. The basic workflow:
- Stabilization: Run clips through Gyroflow (free) or ReelSteady (GoPro). This transforms vibrations into butter-smooth footage.
- Editing software: DaVinci Resolve (free!) is the top choice. Alternatives include Premiere Pro or Final Cut Pro.
- Color grading: If you shot in Flat/ProTune, you'll need color correction. Boost contrast, add vibrancy, introduce warmth to golden hour shots.
- Cut to beat: Cut each clip on the music beat. A dive → bass drop, a power loop → build-up. Rhythm keeps the viewer engaged.
- Speed ramping: Increase or decrease speed at key moments. Slow motion on a gap pass, speed up during a cruise section.
Budget editing setup: DaVinci Resolve (free) + Gyroflow (free) + royalty-free music from YouTube Audio Library or Epidemic Sound (~€13 / ~$13/month). You don't need to spend a single euro on software.
Safety in Freestyle
FPV freestyle operates in full manual mode — no obstacle avoidance, no return-to-home. Safety depends 100% on you:
- Spotter: Always have someone beside you watching the drone with their bare eyes. They can warn you about aircraft, people, or vehicles.
- GPS Rescue Mode: Set up GPS Rescue in Betaflight. If you lose video signal, press a button and the drone flies home. A GPS module (HGLRC M100 Mini, ~€15-20 / ~$15-20) saves drones.
- Beeper: Install a ViFly Finder Mini (~€10-15 / ~$10-15) — if you crash in grass/trees, the beeper locates the drone even if the battery ejects.
- Never fly over people: Ever. A 5″ quad at 150 km/h is genuinely dangerous.
- Pre-flight checks: Props tight? Battery full? Antennas secure? Motor screws tight?
How Much Does a Freestyle Setup Cost
A complete freestyle setup can range from €400 (~$391) for flying only to €1,500+ (~$1,467+) for cinematic video quality. Approximate breakdown:
- Drone (BNF): €250-550 (~$244-538) — AxisFlying Manta 5 SE analog (~€350 / ~$342), GEPRC Vapor D5 O4 (~€500 / ~$489)
- Goggles: €185-600 (~$181-587) — Walksnail Goggles L (~€185 / ~$200), Walksnail Goggles X (~€425 / ~$459), DJI Goggles 3 (~€460 / ~$499)
- Transmitter: €90-200 (~$88-196) — RadioMaster Boxer (~€100-130 / ~$110-140), RadioMaster TX16S MKII (~€180-200 / ~$180-200)
- Action Camera: €70-400 (~$68-391) — Used GoPro Session (~€70-100 / ~$70-100), GoPro Hero 13 (~€370-400 / ~$400-430)
- Batteries (×4-6): €80-150 (~$78-147) — GNB 6S 1300mAh (~€18-22 / ~$18-22 each)
- Charger: €40-80 (~$39-78) — iSDT 608AC (~€50 / ~$50), ToolkitRC M8S (~€60 / ~$60)
- Spares & props: €30-50 (~$29-49) — 20-pack props (~€15-20 / ~$15-20), zip ties, tape, spare arms
Budget setup total: ~€700-850 (~$685-831) (analog BNF + Walksnail Goggles L + RadioMaster Boxer + used GoPro)
Premium setup total: ~€1,300-1,800 (~$1,271-1,760) (DJI O4 BNF + DJI Goggles 3 + RadioMaster + GoPro Hero 13 + ND filters)
Frequently Asked Questions (FAQ)
How long does it take to learn freestyle?
With 30 minutes of simulator practice daily, you'll be flying basic acro in 2-4 weeks. For competent freestyle (power loops, split-S, smooth flow), expect 2-3 months. For advanced moves (Rubik's cube, inverted yaw spins, tight gaps), 6-12 months. But even after years, there's always something new to learn.
Do I need a license for FPV freestyle?
In the EU (under EASA regulations), if your drone weighs over 250g (virtually every 5″ quad), you need registration with your national aviation authority and basic training (A1/A3). For FPV, you always need a spotter. Fly in legal locations, away from airports and never over people. In the US, you need FAA Part 107 or recreational flyer registration.
Analog or Digital FPV for freestyle?
If starting now, go digital (Walksnail or DJI). Better image, DVR, better range. If you want lower cost or ultra-low latency (racing-oriented freestyle), analog remains an excellent choice. Many top freestyle pilots still use analog — it's NOT “outdated.”
How do I find spots for freestyle?
Google Maps/Earth in satellite view — look for abandoned buildings, industrial zones, open parks. Local FPV communities (Discord, Facebook groups). ALWAYS ask permission if the location is private property. Never fly in residential areas.
Which simulator is best?
Velocidrone (~€18 / ~$18) — the most realistic, used by most pro pilots. TRYP FPV (free beta) — excellent graphics, modern physics. Liftoff — solid all-rounder. Uncrashed — free, decent for beginners.