Just picked up a Meta Quest 3 and eager to dive into virtual reality? This complete guide takes you from unboxing to your first VR experience — step by step, leaving nothing out. Powered by the Snapdragon XR2 Gen 2, with a per-eye resolution of 2064×2208 and full-color passthrough cameras, the Quest 3 represents the next generation of standalone VR headsets.
What's in the Box
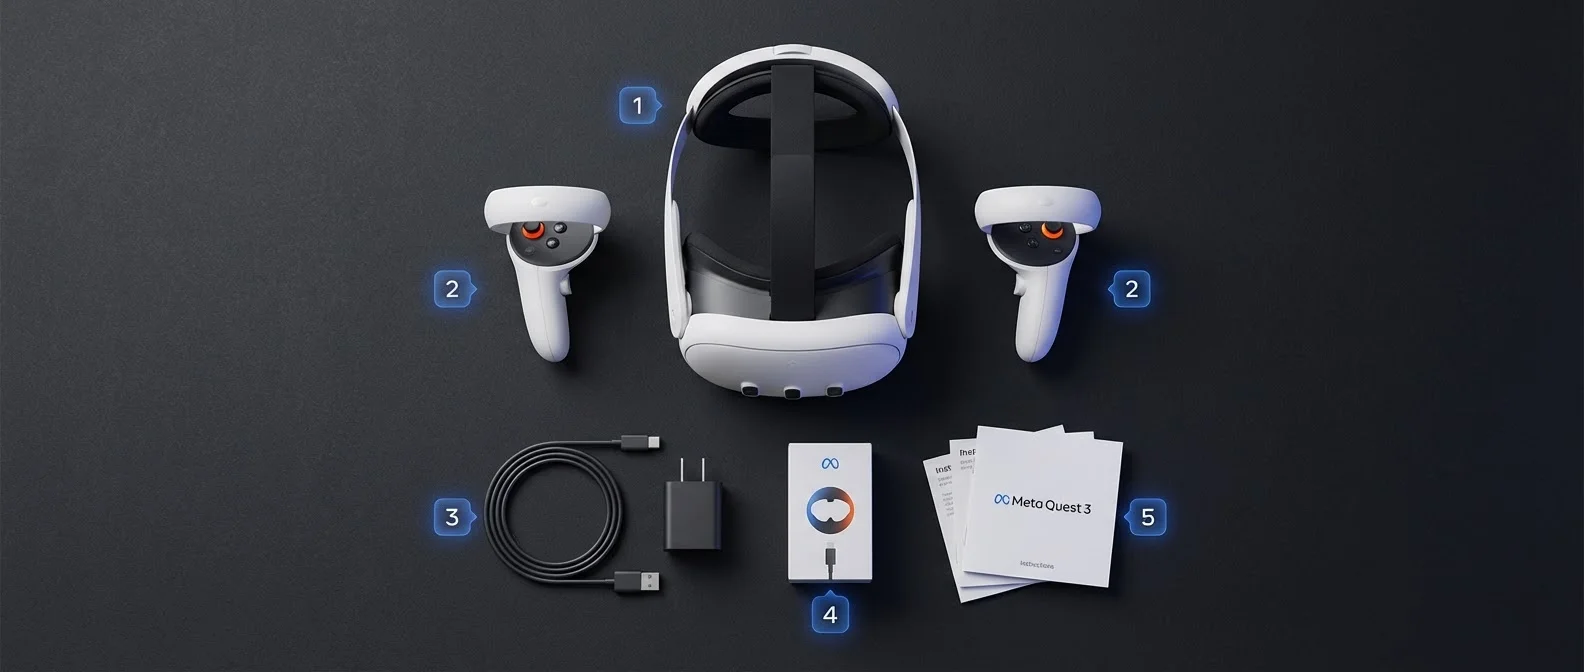
Before diving into setup, let's make sure everything is accounted for. Inside the Meta Quest 3 box, you'll find:
- Meta Quest 3 headset — the main unit with built-in sensors and cameras
- 2× Touch Plus controllers — the new ring-free controllers with infrared sensors
- 2× AA batteries — one for each controller
- USB-C charging cable — for charging the headset
- 18W power adapter — plugs into the USB-C cable
- Glasses spacer — if you wear prescription glasses
- Quick start guide
Tip: Check the Box Contents
Make sure nothing is missing before you begin. If you wear glasses, install the spacer immediately to avoid scratching the lenses.
Step 1: Charging and the Meta Quest App
Charge the Headset
Connect the USB-C cable to the Quest 3 and let it charge fully before first use. A full charge takes approximately 2–2.5 hours, and the 4,879 mAh battery delivers 2–3 hours of use depending on workload intensity.
Download the Meta Quest App
While the headset charges, download the Meta Quest app on your smartphone (iOS or Android). You'll need it for:
- Creating or signing into your Meta account
- Pairing with the headset
- Managing apps and settings
- Purchasing games from the Meta Quest Store
Create a Meta Account
Open the app and create a Meta account if you don't already have one. You can use your existing Facebook or Instagram account, or create a standalone Meta account with just an email address.
Step 2: Pairing and Initial Setup
Power on the Quest 3 by pressing and holding the power button on the right side of the headset for 2–3 seconds. Put on the headset and follow these steps:
- Wi-Fi connection: Select your Wi-Fi network and enter the password. Prefer a 5GHz or Wi-Fi 6E network for the best performance.
- Pairing: On your phone, the Meta Quest app will automatically detect the headset. Follow the pairing prompts and enter the code displayed in your headset.
- Software update: The headset will automatically download any available updates. This may take 10–30 minutes depending on your connection speed.
- Tutorial: Follow the built-in introductory tutorial that explains the basic controls and interactions.
Important: Software Updates
Don't skip software updates during initial setup. They contain critical improvements to tracking, stability, and new features like body tracking and improved passthrough quality.
Step 3: Guardian / Boundary Setup
The Guardian system is essential for your safety. It creates a virtual barrier around your play space so you don't accidentally hit objects or walls while wearing the headset.
Stationary Mode
For seated experiences. Creates a small safety zone around you. Ideal for media apps, virtual cinema, and relaxed games.
Roomscale Mode
For full freedom of movement. Draw your play area boundaries with the controller, or let the Quest 3 auto-detect them using its depth sensors.
The Quest 3 features an infrared depth sensor (IR structured light projector) that can automatically scan your surroundings and suggest boundaries. You can accept the auto-detected boundaries or adjust them manually.
Guardian Tips
- Clear the area of small objects, rugs, or stools
- Ensure good lighting — the cameras need light for accurate tracking
- Leave at least 2×2 meters (6.5×6.5 feet) of free space for roomscale
- Redraw boundaries if you change rooms or rearrange furniture
Step 4: IPD Adjustment (Inter-Pupillary Distance)
Proper IPD adjustment is crucial for a clear image and comfortable viewing. The Quest 3 uses a continuous adjustment wheel on the bottom of the headset, allowing you to set the IPD anywhere between 53mm and 75mm.
- Put on the headset and look straight ahead
- Slowly rotate the IPD wheel on the bottom of the headset
- Stop where the image appears sharpest and most comfortable
- You can verify your IPD value in the headset's settings menu
"Proper IPD adjustment dramatically reduces eye strain and nausea during VR use. Take your time with this step."
Step 5: Key Settings to Configure
Once initial setup is complete, it's time to optimize the settings for the best experience.
Hand Tracking
Enable hand tracking via Settings → Movement Tracking → Hand Tracking. This lets you use the headset with just your hands, no controllers needed. Great for casual use and mixed reality apps.
Passthrough
Full-color passthrough shows the real world through the headset's cameras. Double-tap the headset or set up a shortcut for quick toggling. Essential for mixed reality experiences.
Refresh Rate
Go to Settings → Display → Refresh Rate. Select 120Hz for smoother visuals (slightly increases battery drain) or stay at 90Hz for longer battery life.
Developer Mode
If you want to sideload apps, enable Developer Mode through the Meta Quest app on your phone (Settings → Developer → Developer Mode On).
Additional Settings Worth Checking
- Unlock pattern: Add a PIN or unlock pattern for security
- Notifications: Configure which notifications appear inside VR
- Casting: Share what you see to a TV or smartphone via casting
- Auto-wake: Configure the proximity sensor behavior
Step 6: First Apps to Download
Time to fill your Quest 3 with experiences! Here are the best picks for new users:
Free Must-Have Apps
Top Games (Paid)
Step 7: PC VR Connection (PCVR)
If you have a gaming PC, you can play PCVR titles (SteamVR, Rift Store) through your Quest 3 — either wired or wirelessly.
Air Link (Official — Free)
- Make sure the Meta Quest Desktop app is installed on your PC
- Enable Air Link via Settings → System → Quest Link on your headset
- Put on the headset, go to Quick Settings → Quest Link → Air Link
- Select your PC from the list and connect
Virtual Desktop (Third-Party — Paid)
Virtual Desktop ($19.99 on the Quest Store) often delivers better performance and lower latency compared to Air Link. Ideal for competitive gaming where every millisecond counts.
Wired Connection (Quest Link Cable)
For the absolute lowest latency, use a USB-C 3.0+ cable (the official Quest Link cable or a quality third-party cable, 3–5 meters in length).
PCVR Requirements
For wireless connection, you need a 5GHz Wi-Fi router (ideally Wi-Fi 6/6E) and your PC should be connected via Ethernet. Minimum GPU: NVIDIA GTX 1060 or AMD Radeon RX 580.
Troubleshooting Tips
If you run into problems during setup or use, try these solutions:
Tracking Issues
Improve room lighting. Avoid reflective surfaces and clean the camera lenses. Restart the Guardian setup process.
Blurry Image
Adjust the IPD properly. Tighten the straps for correct positioning. Clean the lenses with a microfiber cloth (NEVER use wet wipes).
Slow Wi-Fi / Air Link
Use the 5GHz band. Move your router closer. Close bandwidth-heavy apps on your network. Connect your PC via Ethernet.
Motion Sickness
Start with stationary experiences. Gradually increase session length. Use vignette/comfort settings in games. Stop immediately if you feel unwell.
Factory Reset
If nothing else works, you can perform a factory reset: press and hold the power button and volume down simultaneously until the boot menu appears. Select “Factory Reset” using the volume buttons and confirm with the power button. Warning: this will erase all data.
Conclusion
With the Snapdragon XR2 Gen 2, pancake lenses, and mixed reality cameras, the Meta Quest 3 stands as one of the best values in the VR market today. While initial setup may seem time-consuming, following this step-by-step guide will have you up and running in under an hour. Remember: proper IPD setting, a good Guardian setup, updated software — and the world of VR is yours to explore!
"Everything the Quest 3 does, it does well — it feels much more complete out of the box compared to the Quest 2, with fewer obvious areas for improvement."